Angle Basics
Angle Basics Revision
Angle Basics
Understanding the basics of angles will help you with many other geometry topics. We will cover the different types of angles, angle notation and how to measure angles in this topic.
Skill 1: Types of Angles
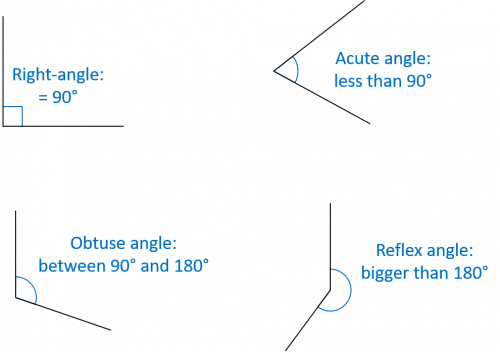
There are four types of angles you need to know. These are:
- Right-angles – these are equal to 90\degree and are indicated by a square corner.
- Acute angles – these are small angles less than 90\degree
- Obtuse angles – these are angles larger than 90\degree but less than 180\degree
- Reflex angles – these are the biggest angles and are larger than 180\degree
Skill 2: Angle Notation
There are a few different ways to label angles, but the most straightforward is to use three letters, where the middle letter indicates the position of the angle. The other two letters indicate the two lines that form the angle.
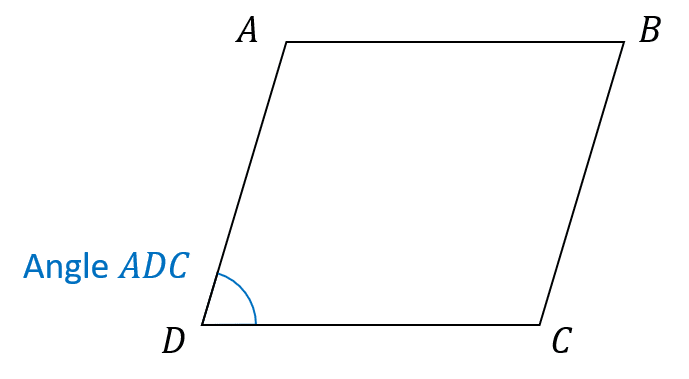

For example, in the image shown the angle \textcolor{#0070C0}{ADC} is the angle at the corner \textcolor{#0070C0}D formed by the lines \textcolor{#0070C0}{AD} and \textcolor{#0070C0}{DC}.
We could also write this angle as \textcolor{#0070C0}{\angle ADC} or \textcolor{#0070C0}{A\hat{D}C}
All three types of notation are perfectly acceptable.
We could also call this angle \textcolor{#0070C0}{CDA}. As long as the middle letter is where the angle is and the two other letters indicate the joining lines, they can appear in either order.
Skill 3: Measuring Angles
Measuring angles requires the use of a protractor. Here are some helpful tips for using a protractor:
- Line the middle of the protractor up with the angle ‘corner’
- You need to make sure you are measuring from 0\degree, so be careful to line things up properly
- Read the scale from 0 to the exact position on the line to measure the size of the angle
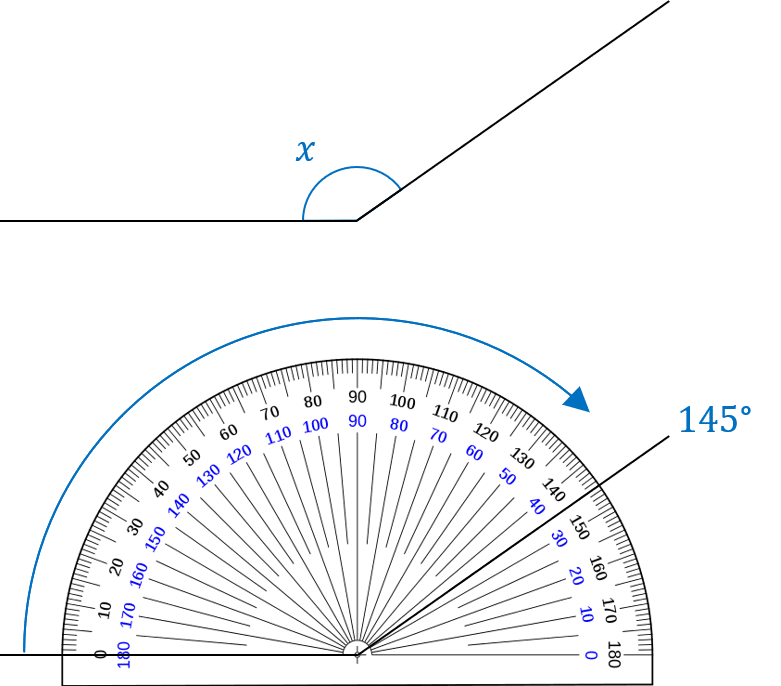

Example: Measure the size of the angle marked \textcolor{#0070C0}x
Following the steps above, the first thing is to line properly align the protractor. As can be seen, the cross in the centre of the protractor is situated directly over the point or ‘corner’ of the angle x.
The protractor is also aligned such that the ‘flat’ line of the angle is at 0\degree
Reading from 0, we can see that the other line crosses the scale at 145, so the angle \textcolor{#0070C0}{x=145\degree}
Be careful when using a protractor with two scales, like the one shown – ensure you are always reading from the correct position.
Skill 4: Drawing Angles
Drawing angles requires also requires the use of a protractor. The same tips apply as for measuring angles using a protractor, however the process is slightly different.
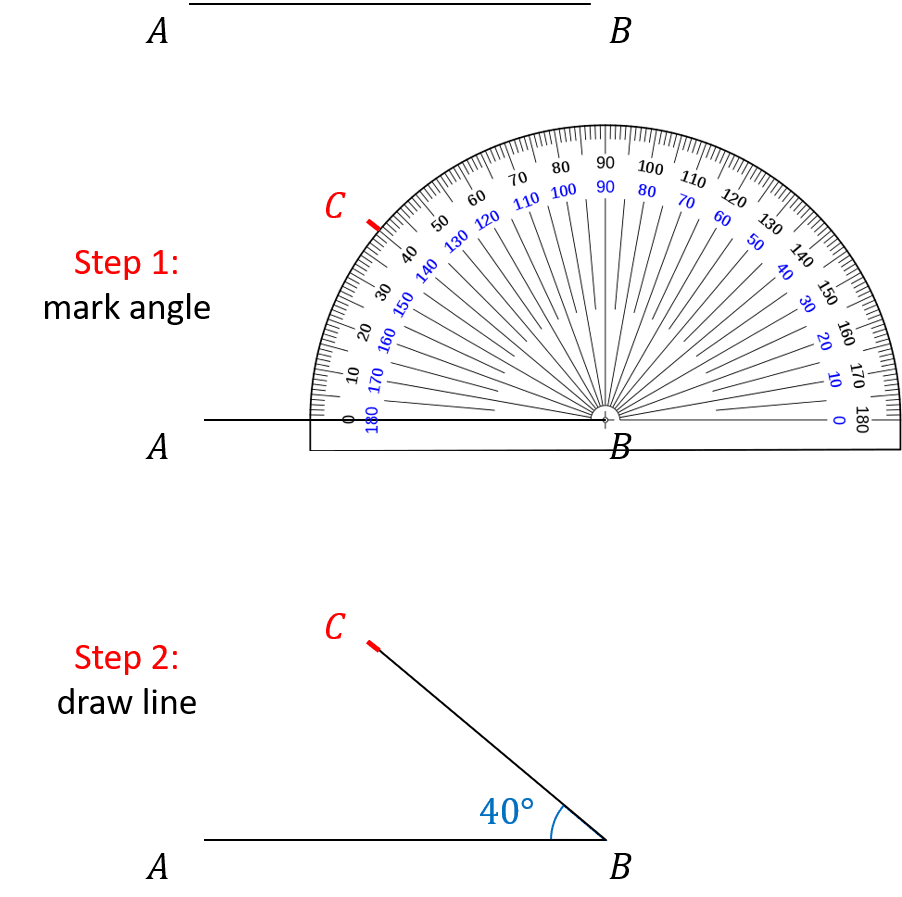

Example: Mark another point labelled C such that the angle
ABC = 40\degree
The process is similar to measuring an angle but with a couple of differences.
Step 1 is to measure the angle and mark the location of the point. Again, place the centre of the protractor over the point B and align the scale so that the line AB goes through 0\degree. Mark the point \textcolor{red}C at 40\degree.
Step 2 is to draw the line between the points B and C
Angle Basics Example Questions
Question 1: State whether angles x, y and z are right-angles, acute angles, obtuse angles or reflex angles.

Angle x is clearly larger than a right-angle (a square corner), but not as big as the angle in a straight line (180\degree). Therefore angle x is obtuse.
Angle y is also obtuse.
Angle z is larger than the angle in a straight line, so it is a reflex angle.
Question 2: The shape ABCD is a parallelogram. State the angles that are equal to 75\degree and the angles that are equal to 105\degree
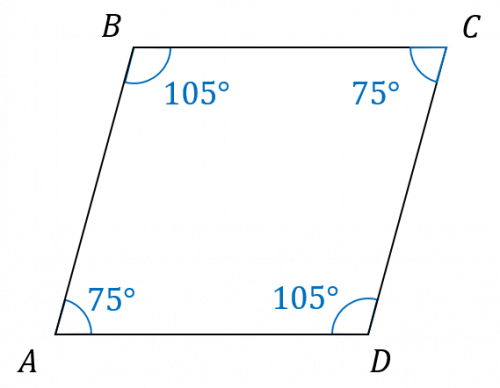
Angles BAD and BCD are both equal to 75\degree
Angles ABC and ADC are both equal to 105\degree
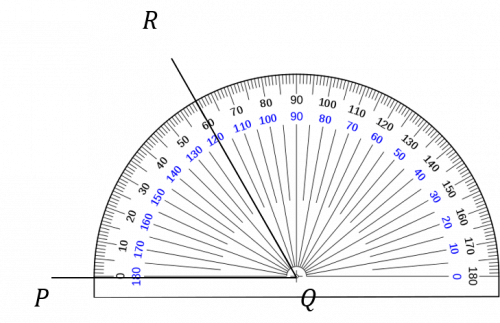
Question 3: Measure the angle PQR using a protractor.

MME Premium Membership
£19.99
/monthLearn an entire GCSE course for maths, English and science on the most comprehensive online learning platform. With revision explainer videos & notes, practice questions, topic tests and full mock exams for each topic on every course, it’s easy to Learn and Revise with the MME Learning Portal.
Sign Up Now


